本节内容,来自Explore bindless rendering in Metal
In this session, we're going to explore bindless rendering in Metal.
Bindless is a modern resource binding model that allows making groups of resources available to the GPU to implement modern rendering techniques.
First, we'll take a look at the need for the concept behind bindless.
Then, we will introduce the bindless model and show how it provides the flexibility needed to solve the challenges of the traditional binding model.
We will recap the mechanisms to encode and make your scene resources available to Metal with argument buffers and how to navigate your GPU structures from shaders.

Let's get started! So bindless rendering allows making all our scene resources available to our shaders, bringing incredible flexibility to our graphics techniques.
Let's take a look at an example.
Let's imagine we have a ray tracing kernel finding intersections against an acceleration structure.
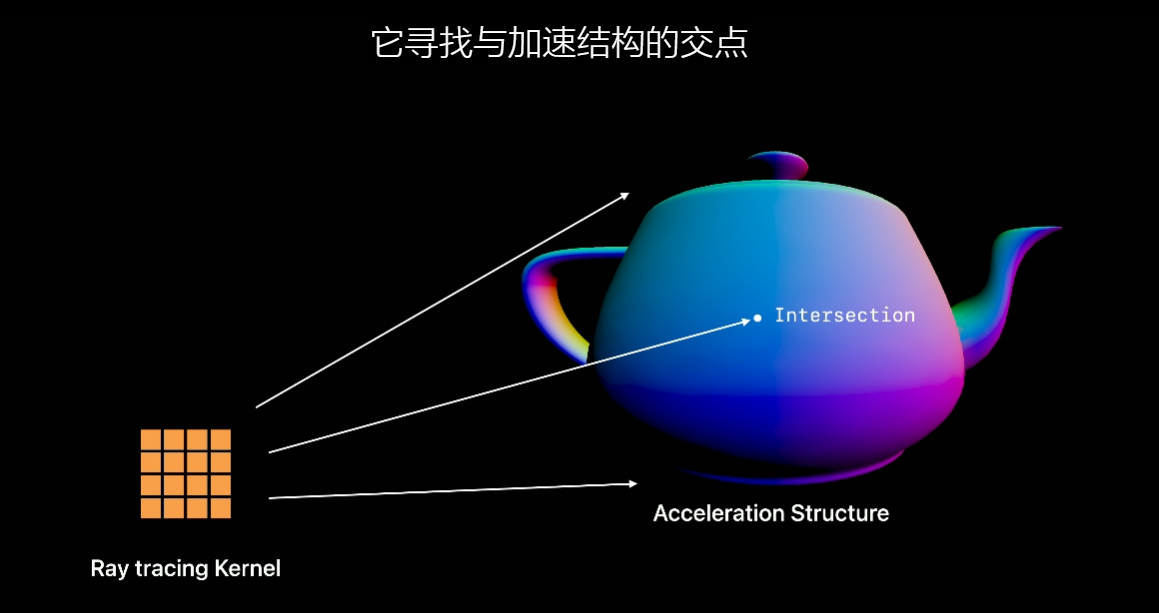
For some light effects, such as ray-traced shadows, the algorithm is very natural.
We want to find any objects between the intersection point and the light.
All we need to trace the shadow ray is a position and the direction toward the light.
No object attributes or Metal resources are needed beyond the world-space position of the intersection, which we can derive from the ray and the intersection's parameter.
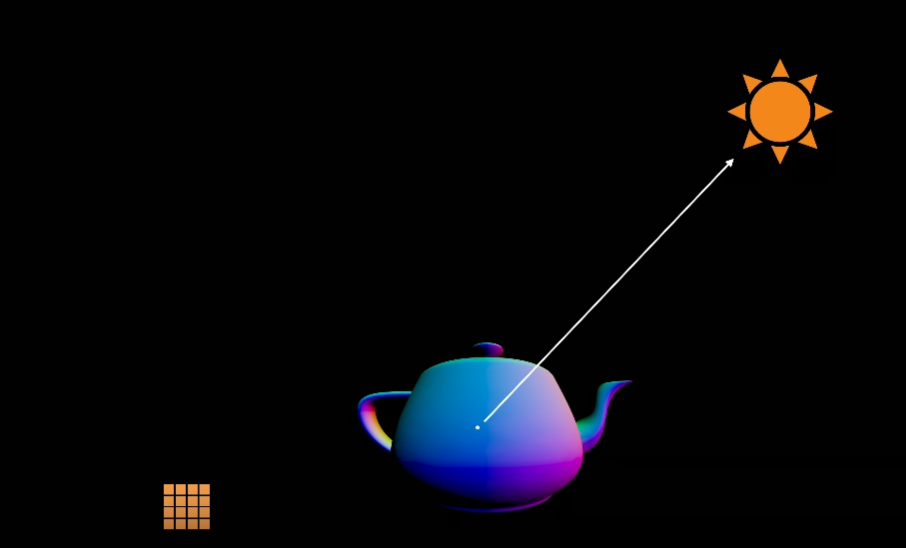
For other effects however, such as reflections, the situation gets more complicated.
Let's take a look at a ray tracing reflection shader in Metal Shading Language.
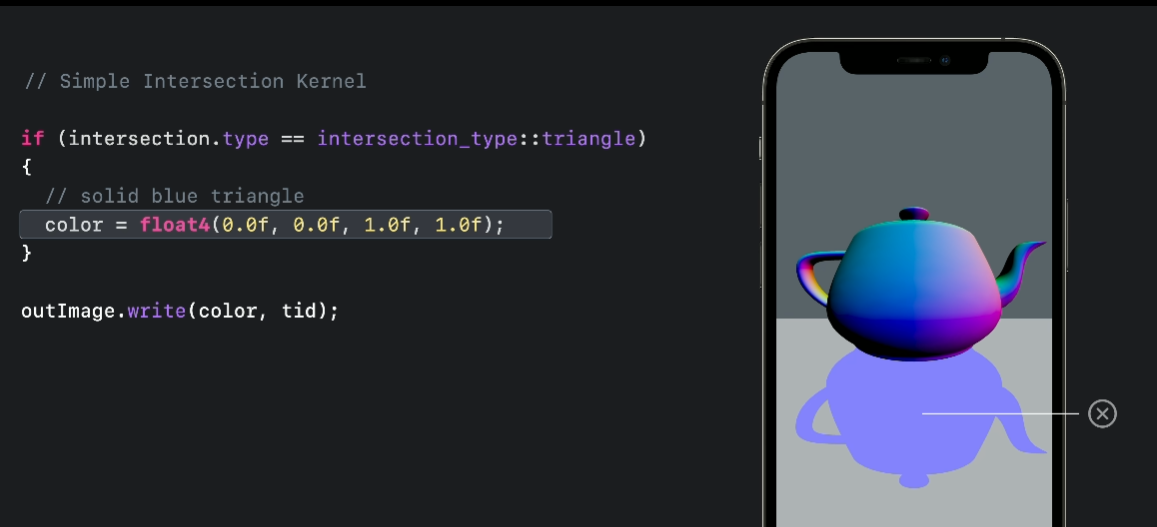
In this new example, we've just found an intersection, and we're trying to paint the pixel with the correct reflected color.
If we just paint a solid color after we find an intersection, the reflection on the ground will not look accurate.
To produce correct results, we need to determine the attributes of each reflected point found and calculate the correct shading for its pixel.
This problem is also present for other ray-traced effects such as diffuse global illumination and even ambient occlusion in some cases.
The challenge is that when we ray trace, our rays may hit any object in the acceleration structure.
This means that from our ray tracing shader, we potentially need access to any Metal resources in our scene, including vertex data -- associated with the mesh intersected -- and its material.
It is just not possible to bind this amount of resources directly to our pipeline.

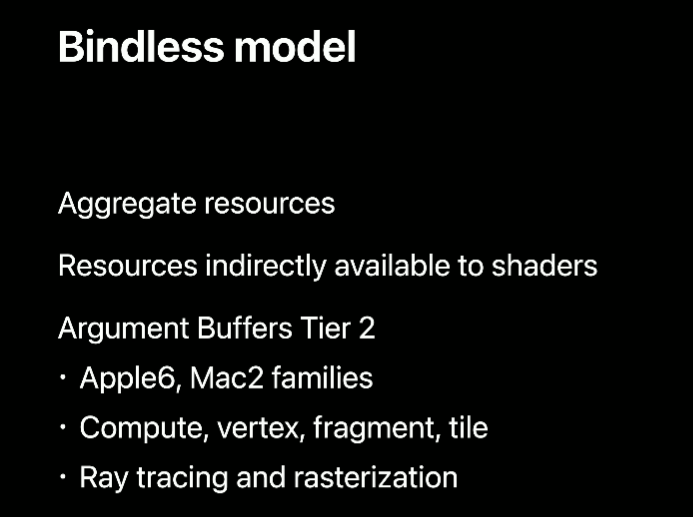
This is where the bindless binding model comes in.
The idea behind bindless is to aggregate our resources and link them together.
This allows us to bind a single buffer to the pipeline and make all referenced resources available via navigation.
In Metal, the construct that allows us to do this is argument buffers.
In particular, for bindless, argument buffers Tier 2 are required.
These are available on the Apple6 and Mac2 GPU families.
Argument buffers can be used from all shader types in Metal.
This means that you can use them for both ray tracing and rasterization.
As we saw, for certain ray tracing effects, using bindless is mandatory in order to obtain good visual results.
For rasterization, the use is optional but provides advantages over the direct binding model.
In particular, it virtually removes the slot limits for the number of resources that can be bound for any given draw call, and it also provides some nice optimization opportunities that we'll explore later in this session.
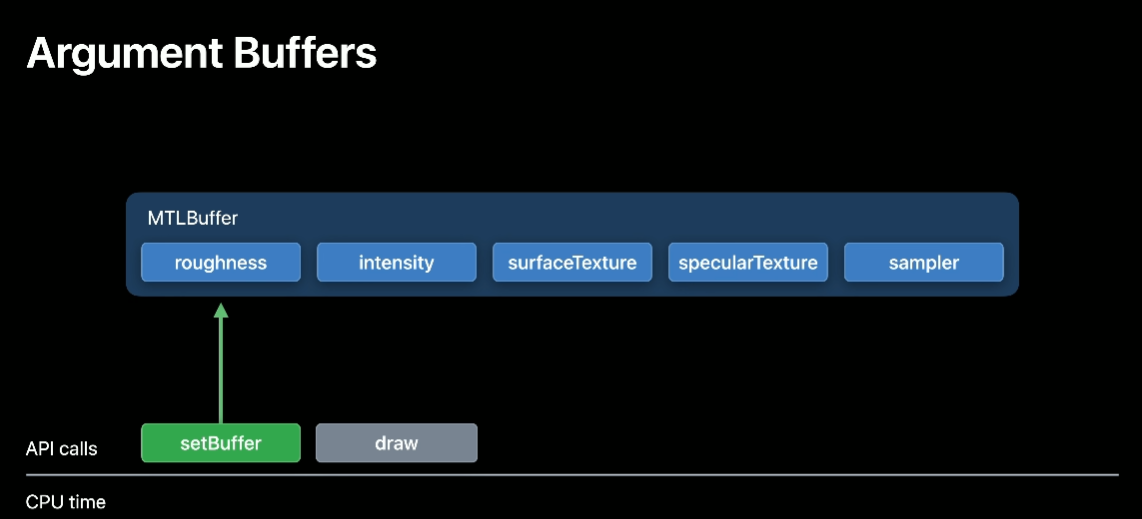
We introduced argument buffers with Metal 2 as a mechanism to allow you to bind constant data and resources all at once in a single call to the Metal API.
Argument buffers are very flexible and can even reference other buffers.
The idea behind the bindless model is to leverage this capability to link all of our scene resources together.
This will allow making them available to the GPU at the same time.
Let's look at an example of a way to link our scene resources with argument buffers.
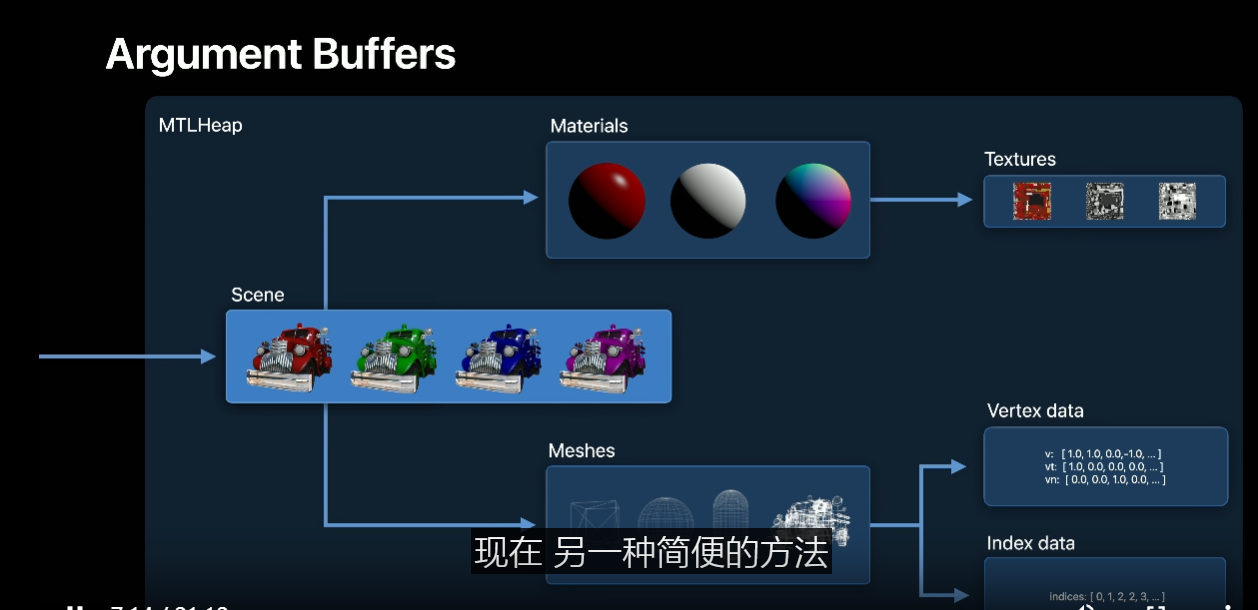
Let's say we want to render a model such as this fire truck.
The model is comprised of textures, vertex data, and index data.
These are the typical resources you would bind one by one for every draw call in the traditional binding model.
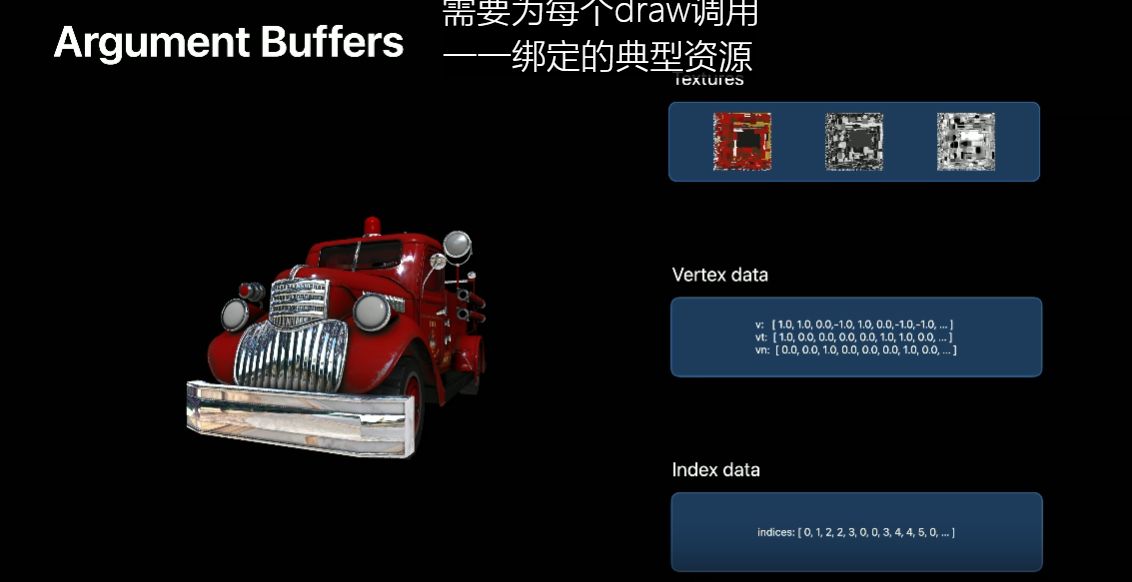
In our case, however -- because we want to make all textures, vertex data, and indices of the scene available at once -- we need to aggregate these.
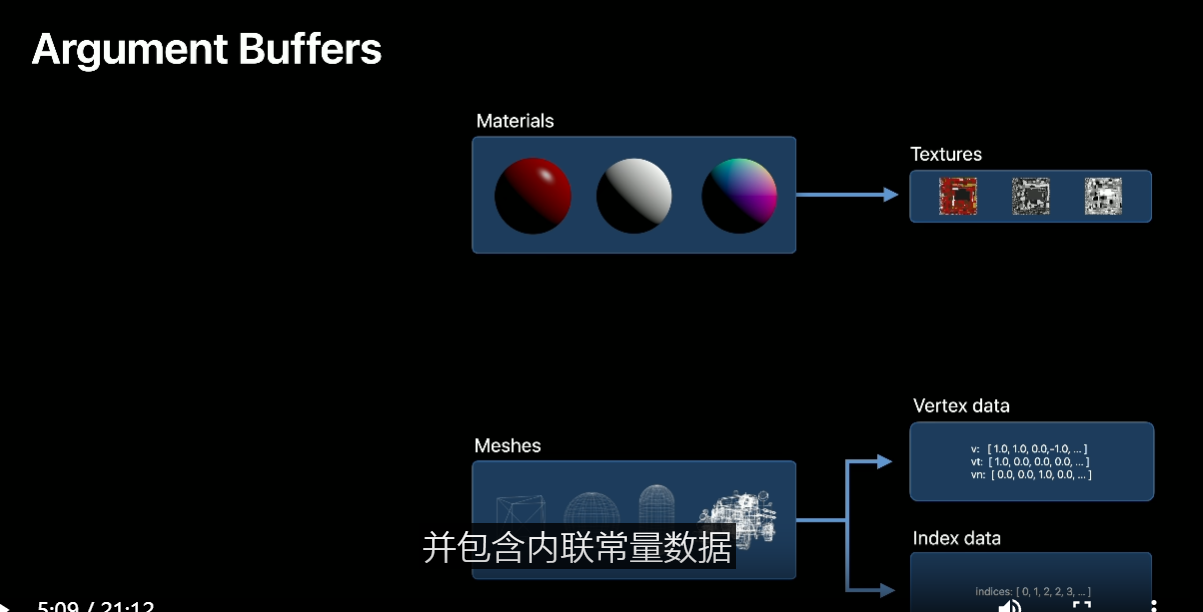
Here's a potential way to do so.
We can first create a meshes argument buffer to contain all our meshes or submeshes, depending on how our assets are organized.
This argument buffer will allow referencing the vertex and index arrays in our scene.
Similarly, we can do the same and encode our materials to an argument buffer.
Each material can reference its textures as well as contain inline constant data.
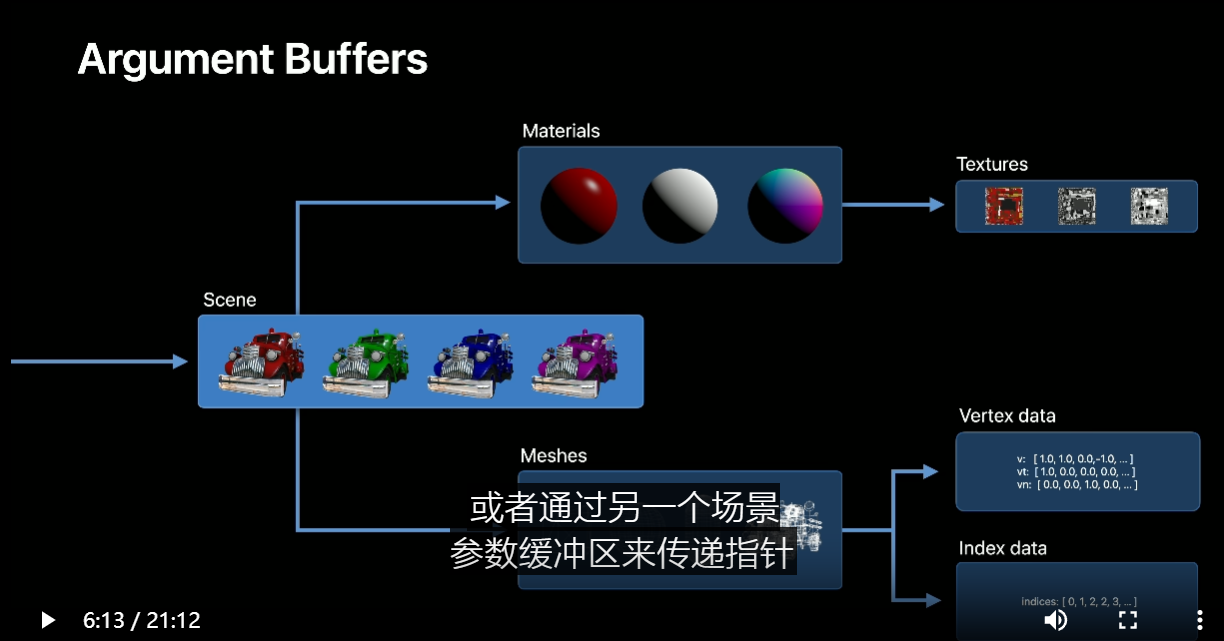
OK, but now that we have all our meshes and materials available to the GPU, how can we bring them together? Well, we can, for example, create an instance object and also place it in an argument buffer.
An instance can reference one mesh and an associated material.
This is also a great place to store a model transformation matrix as inline constant data.

But we don't have to stop there.
Now that we can store one instance, we can take this further and encode all of our instances as an array into this argument buffer.
Let's simplify this diagram and add a few more truck instances, each one with its own material.
As we can see, with this, we can now have our full scene and its resources encoded and linked with argument buffers.
Later, when we want to reference any of these resources from our shaders, we just need a pointer to the instances buffer.
We can pass it directly and interpret this buffer as an array, or pass a pointer through another scene argument buffer.
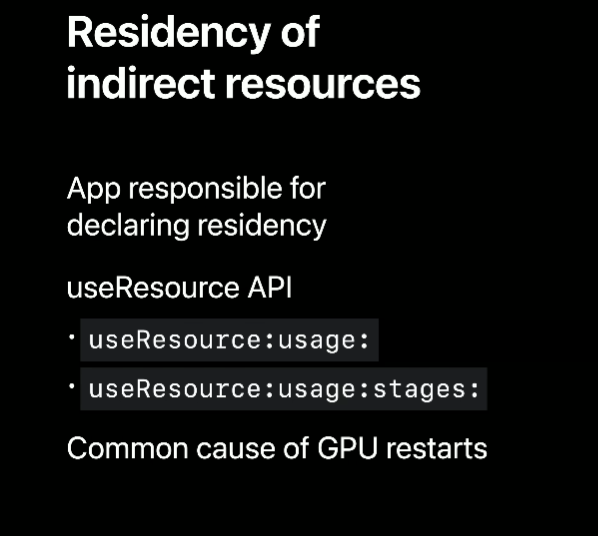
Now, it's important to note what happens with the residency of indirectly accessed resources.
Since we're only passing a pointer to the scene into the pipeline, Metal will know about this buffer reference, but not about resources accessed indirectly.
The application is responsible for declaring residency of all indirectly accessed resources.
Making a resource resident means signaling to the driver to make its memory available to the GPU.
This is necessary so we can reference them from our shaders.
We can do this by calling the useResource:usage: API for compute encoders and useResource:usage:stages: API for render command encoders.
Accessing a nonresident resource is a common cause of GPU restarts and command buffer failures.
This is because its memory pages may not be present if we forgot to call this API.
So it's very important to declare every indirectly accessed resource to Metal.
Now, another option, for convenience, is that resources allocated from MTLHeaps can now be made resident with a single call by means of the useHeap API.
This is a great option if you are already suballocating or planning to suballocate resources from heaps.
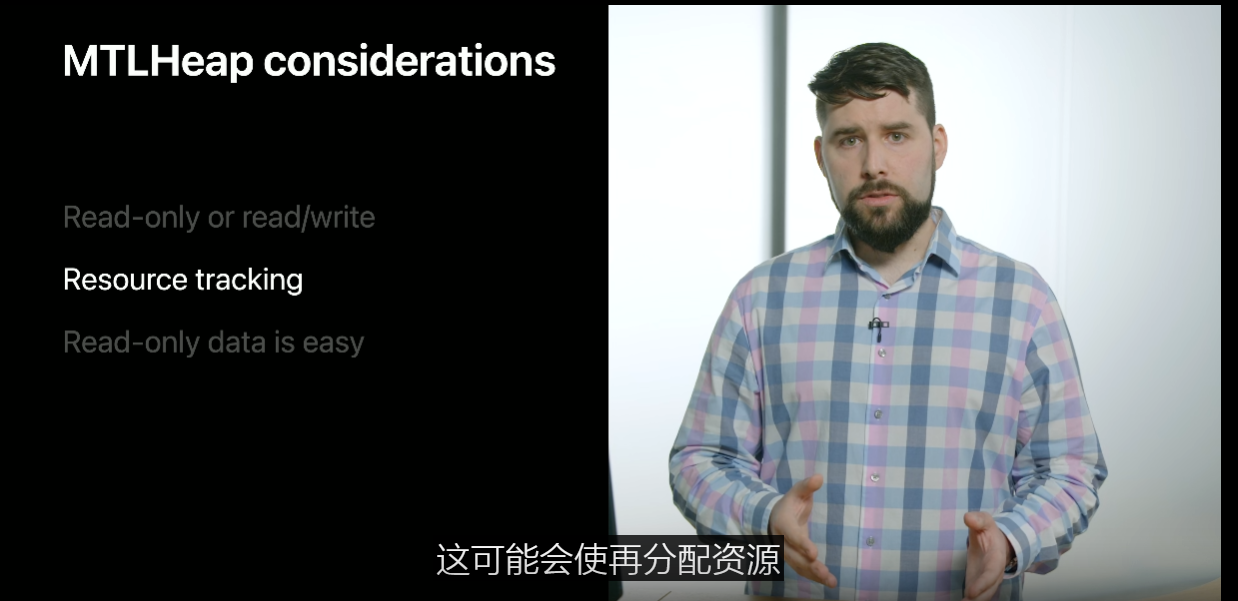
Now, heaps are a fantastic part of the Metal API, and we recommend you use them for the best resource-creation performance, and memory-saving opportunities.
There are, however, a few considerations to use them effectively.
The first thing to ask is, Are all our suballocated resources only read from? Examples of where we might need to write into a resource include mesh skinning from a compute shader and dynamic textures, amongst others.
In these cases, if the GPU needs to write into any resources, they need to be declared resident individually with the write usage flag.
Additionally, any resources that may have been modified that we now intend to read from will still need their own useResource call.
This is so that the Metal framework can handle resource transitions for you, flushing GPU caches and adjusting the internal memory layout.
The second consideration is, Does the heap track suballocate resource dependencies? Again, this is especially important if we're reading and writing into resources coming from the same heap.
Metal is great at avoiding synchronization problems through dependency tracking, and since Metal 2.3, heaps can be configured to track hazards in the access to their resources.
However, since heaps are a single resource to Metal, synchronization is handled at the heap level not the suballocation level.
This may subject suballocated resources to the problem of false sharing.
Let's take a look.
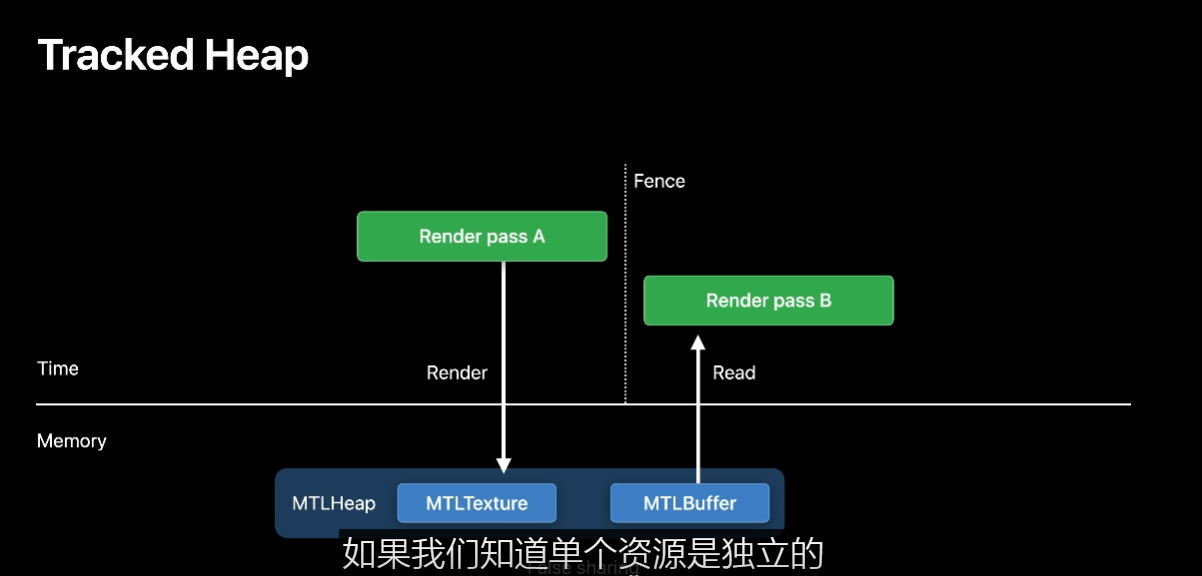
Let's imagine we have two render passes -- A and B -- accessing resources from the same heap.
Render pass A is rendering to a render texture allocated from a tracked heap.
Render pass B is reading from an unrelated buffer that is suballocated from the same heap.
Depending on different conditions, render passes A and B may qualify to be executed in parallel by the GPU;
however, due to the potential hazard of writing and reading from the same resource -- the heap -- Metal has to serialize access to ensure there are no race conditions.
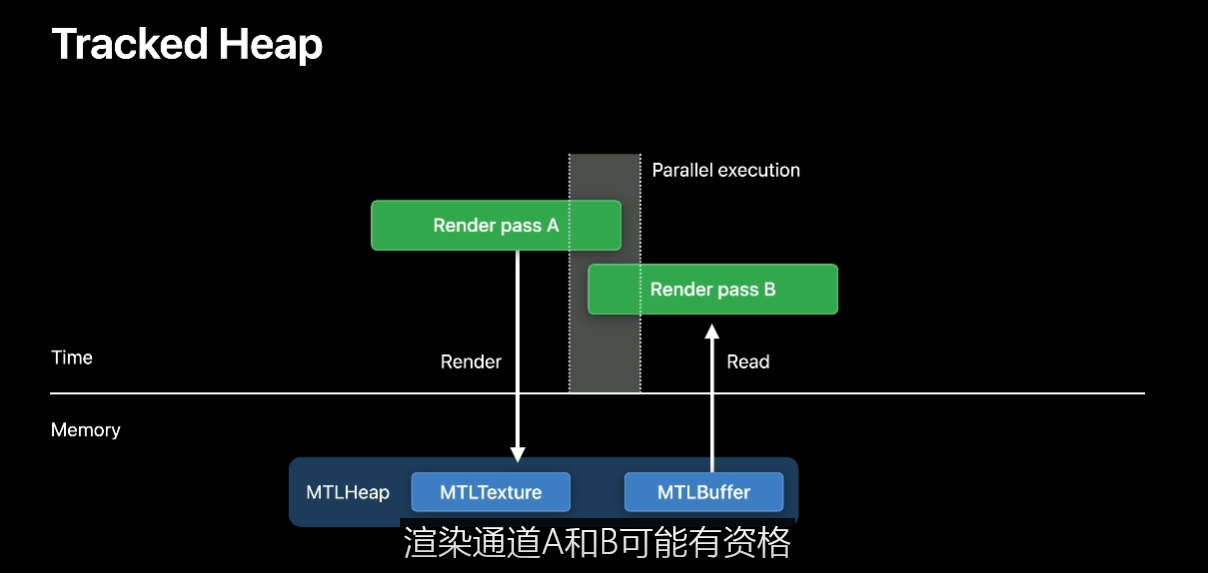
This can potentially increase the execution wall-clock time of our workload by the GPU.
In our case, however, if we know the individual resources are independent, this fence could be avoided.
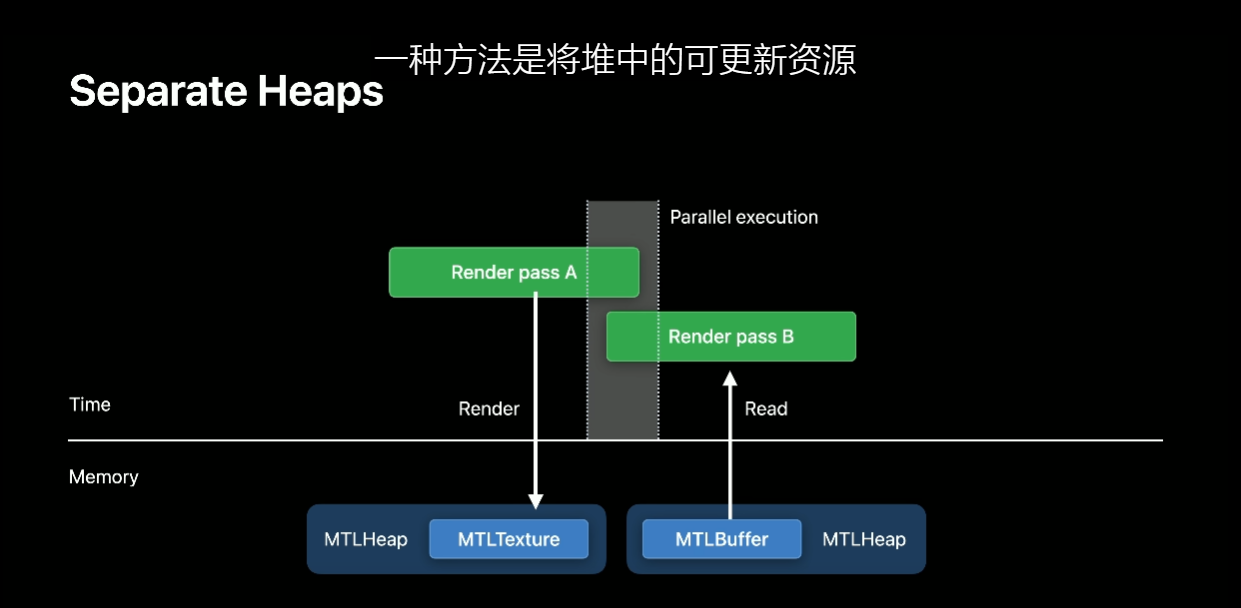
There are two ways to do this.
One option is to suballocate resources that are updatable from heaps separate to the ones used for our static resources.
The other option, if we desire to bundle everything together, is to make sure heaps are configured not to track their suballocated resources.
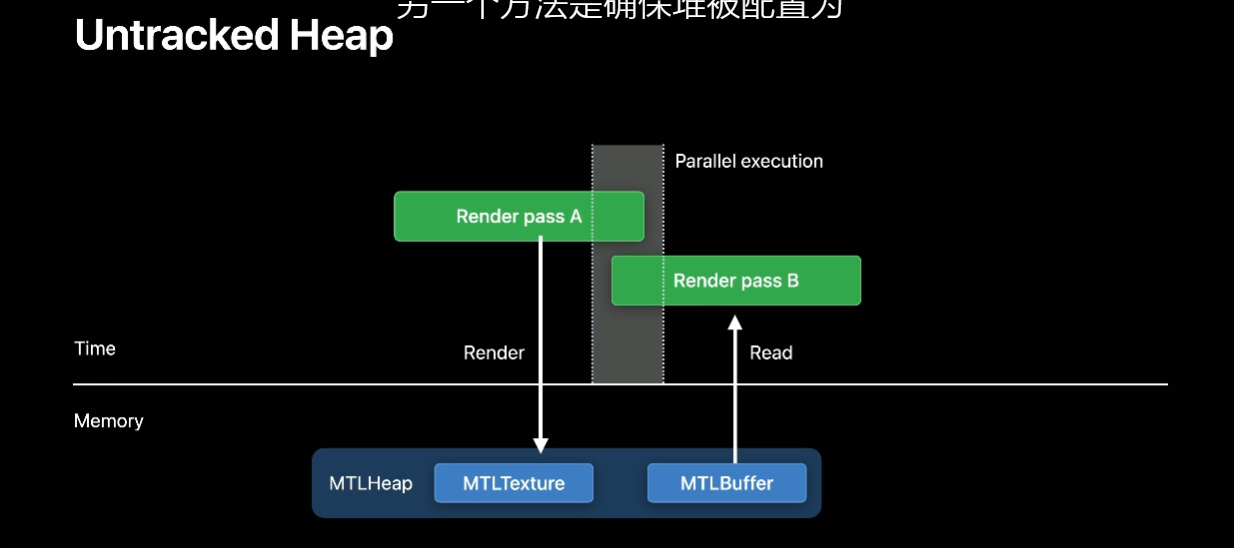
This is the default behavior in Metal, and it means we as programmers take on the responsibility of synchronizing hazards ourselves.
Now, in this diagram I simplified things a bit to illustrate the problem of false sharing.
In practice, overlapping occurs at the shading stage level, not at the render pass level.
As a consequence, Metal allows us to specify our fences at the stage granularity.
This is great because it allows us to still run parts of our pipeline -- such as vertex stage and rasterizer -- concurrently, and only block later in the fragment stage if it happens to depend on a previous pass's fragment stage output.
We recommend you always do this for maximum performance, if possible.
Now, this is a lot to remember, so if you only get one thing from this list, please remember this: read-only data, such as static textures and meshes, are the easiest to handle.
Determine the total allocation size and alignment requirements upfront and place these resources in a heap when the app starts or during a loading section in your game.
This way, you can later make it resident in a single call, with minimal overhead in your critical path.
Now that we know about the bindless binding model, let's take a look at how we can encode our resources and put this in practice and make our complete scene available to the GPU with argument buffers.
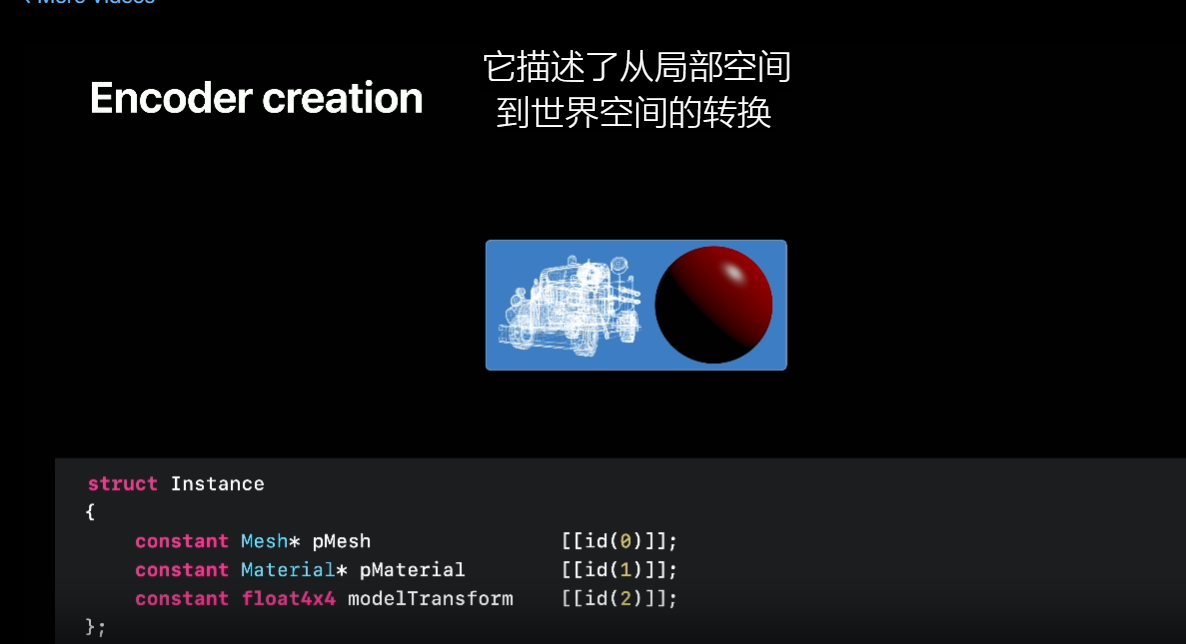
Let's say we want to encode our instances buffer.
Remember, this buffer consists of an array of instances.
As we saw, instances reference a mesh, a material, and contain an inline constant 4x4 matrix describing the transformation from local to world space.
Encoding is performed via an argument buffer encoder, and there are two distinct ways to create one in Metal.
You may be familiar with encoding via reflection.
If the argument buffer is passed as a direct parameter to the shader function, we can ask the MTLFunction object to create an encoder for us.
This mechanism works great, but when we are encoding the entire scene into argument buffers, not all encoders can be reflected.
In particular, the MTLFunction signature does not know about the indirectly referenced buffers.

There might also be other situations where creating an encoder from a MTLFunction is not convenient; for example, if your engine architecture handles argument-buffer creation and resource loading separate from pipeline state creation.
Additionally, we cannot reflect an encoder when the function is expecting to be passed an array.
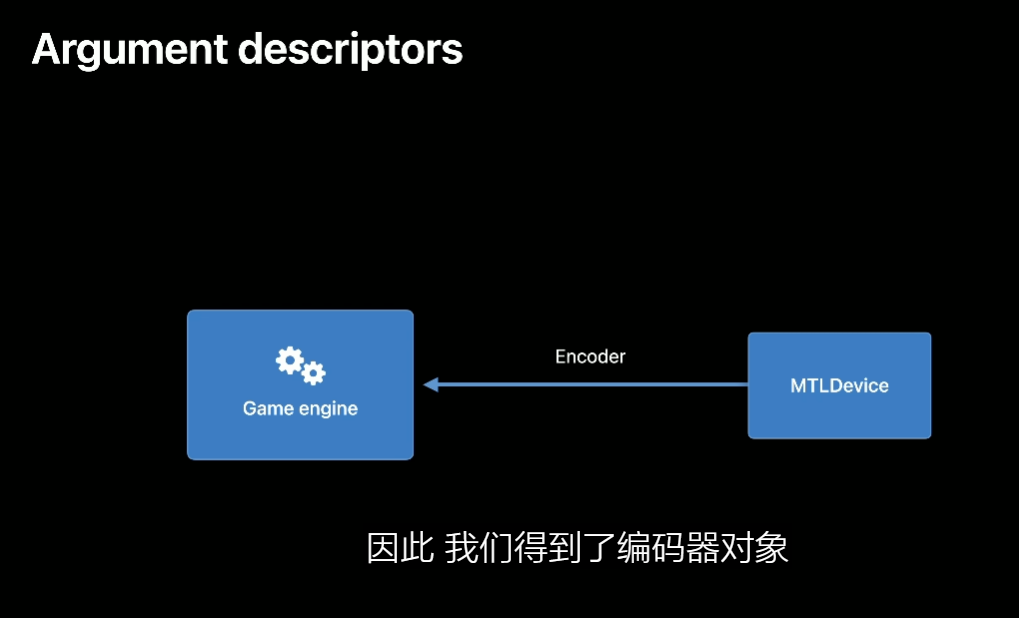
So what can we do in these cases? For these cases, Metal provides a convenient second mechanism to create an encoder through a MTLArgumentDescriptor.
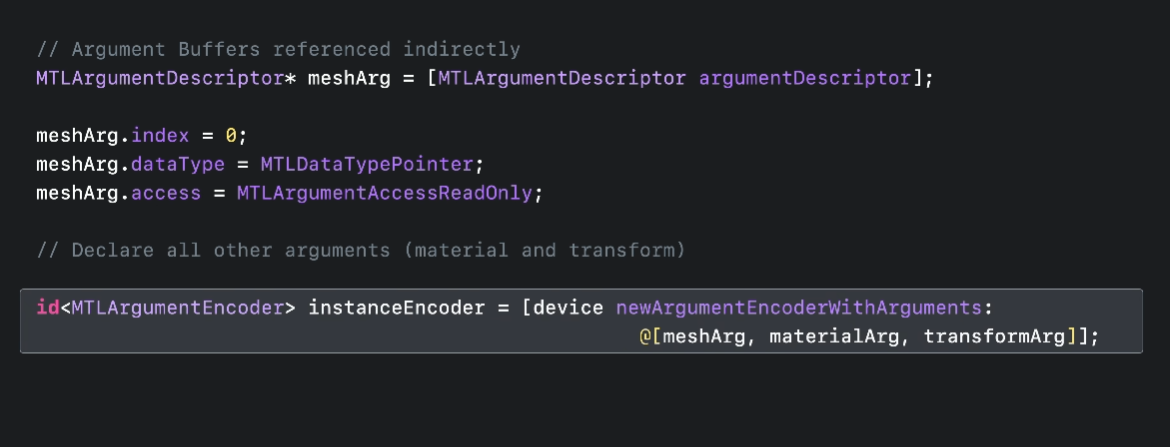
MTLArgumentDescriptors allow describing the struct members to Metal and subsequently creating an encoder without a MTLFunction.
We must first create a descriptor for each member, specifying data type and binding index.
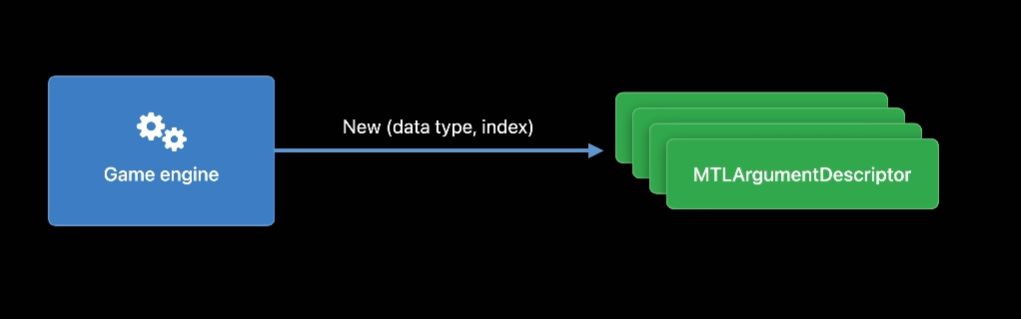
Next, we take our descriptors, and pass them directly to the MTLDevice to create our encoder.
As a result, we obtain our encoder object back.

So let's explore what this looks like in code.
For each member, we needed to create a MTLArgumentDescriptor; we specify the binding index, corresponding to the ID attribute for the member in the struct; we specify the MTLDataType and potentially access; and finally, after we've declared all the members, we can create the encoder directly from the device, passing an array with all our descriptors.
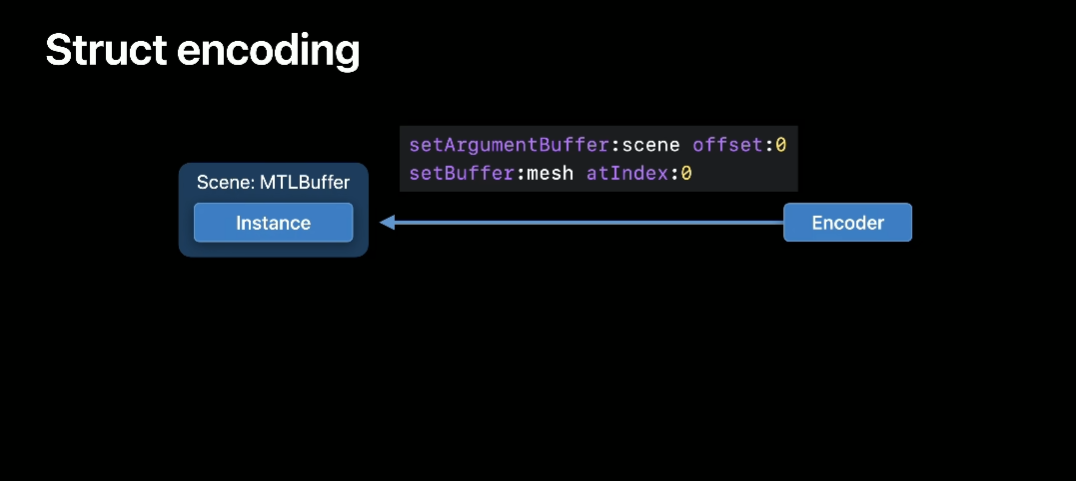
Once we have an encoder, it's straightforward to record our data into a buffer.
We set the argument buffer on the encoder, pointing at the beginning of the buffer.
Then, we simply set the data we want to store.
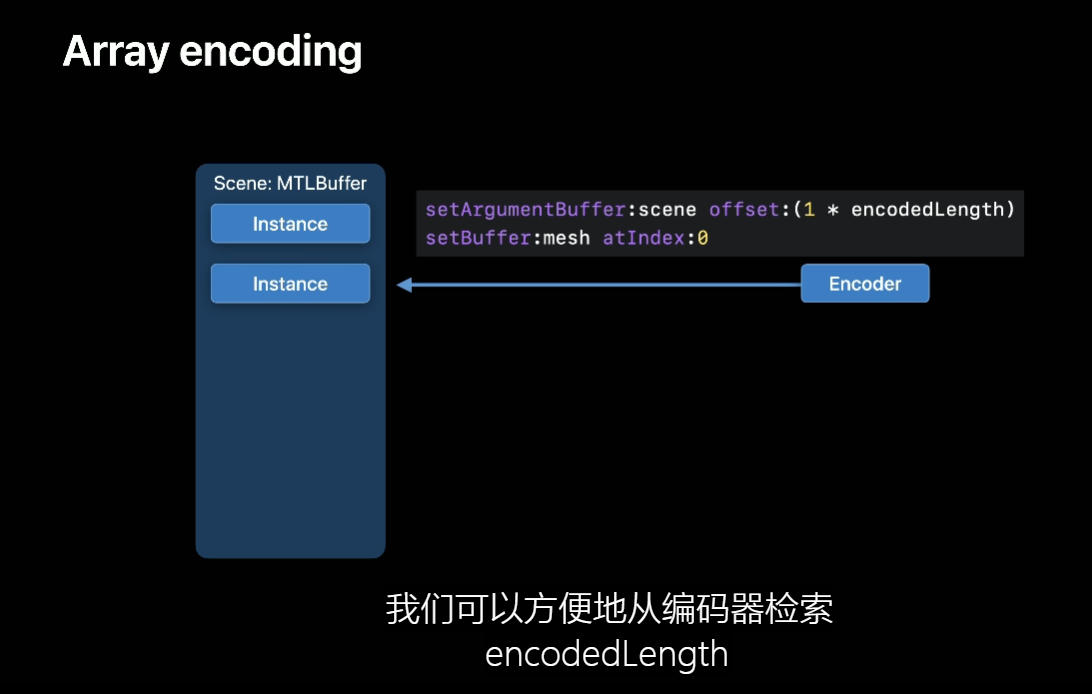
Encoding an array is simple as well.
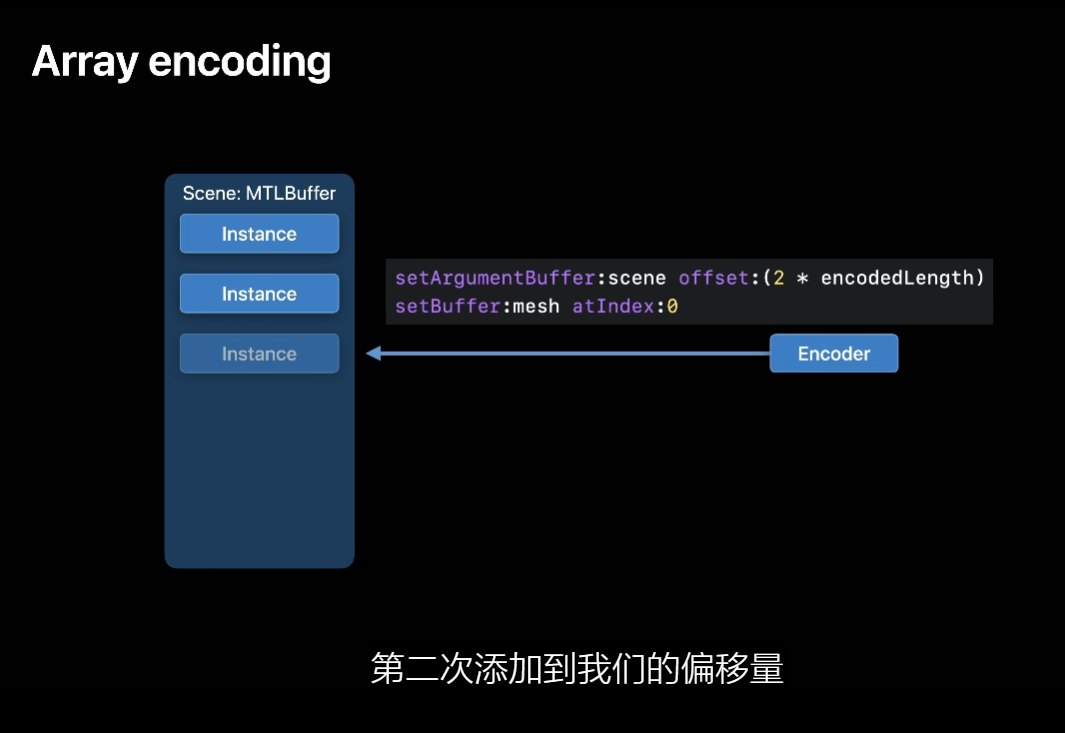
All we have to do is offset the encoder's argument buffer recording point by the encodedLength, which we can conveniently retrieve from the encoder.
For the next instance, we add the encodedLength to our offset a second time.
In fact, the offset for each position we need to record in is going to be the index times the encodedLength.
This mechanism makes it very easy to encode arrays of structs.
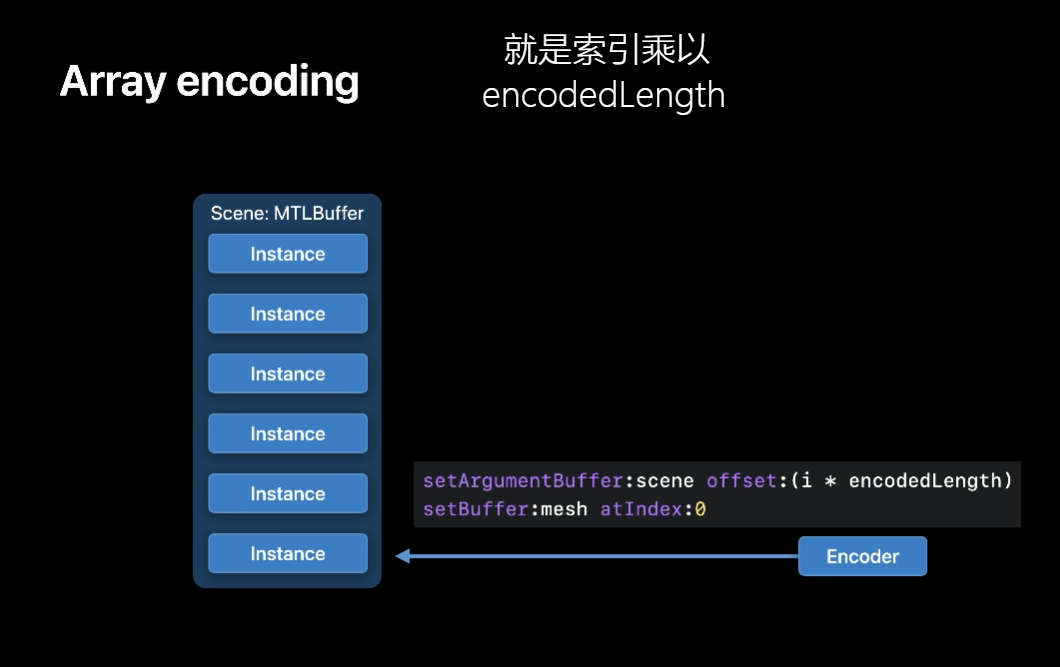
Now, one important point worth mentioning is that no special treatment is needed from shader side to index into these arrays.
The shader does not need to know the length of the buffer and can freely index into any location in the array.
It just works! OK, now that we have encoded our bindless scene, let's take a look at navigation.
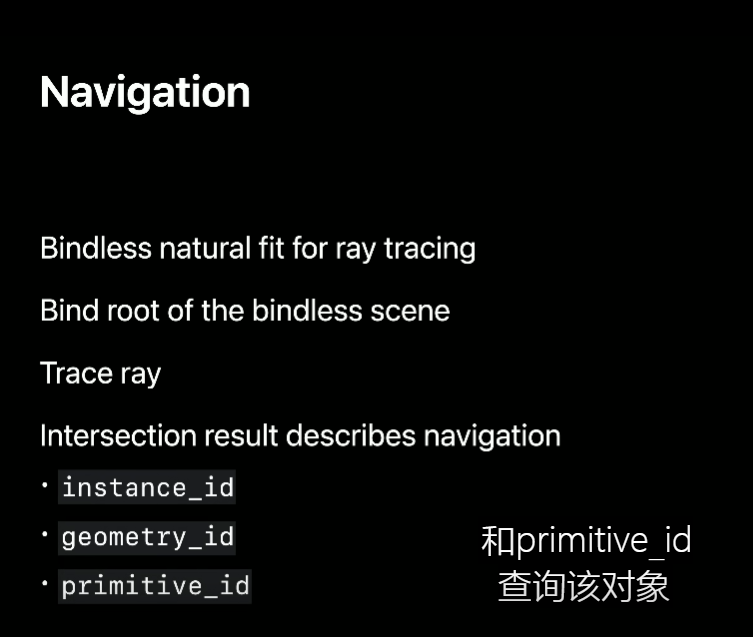
For the case of ray tracing, navigation is very natural.
First, we bind the buffer that contains the root of our bindless scene to our ray tracing pipeline.
This is the argument buffer from where we can access all the others.
Next, from our kernel, we proceed with the ray-traced intersection as usual.
After we discovered an intersection, the intersection result object describes the navigation.
We can query this object for instance_id, geometry_id, and primitive_id.
These members are designed specifically for navigating our acceleration structures.
It is, therefore, important to build our bindless scene with a structure that mirrors our acceleration structures, such as the one shown earlier.
Let's take a look at it again.
Remember, this is just an example of how to organize the scene, so I'm going to navigate it according to how I organized it.
The particular details for your scene may vary, according to how you decide to organize your own argument buffers.
First, we need to find an intersection.
Once we have it, because we strategically organized our bindless scene, given the instance_id we can now follow the pointer to the instances buffer and determine which one we hit.
Next, as we saw, the instance knows its mesh and material.
So we can simply use the geometry_id to determine which geometry we hit within the referenced buffer.
Finally, if we prepared each mesh to know its index buffer, we can use the primitive_id to determine the exact primitive that we hit.
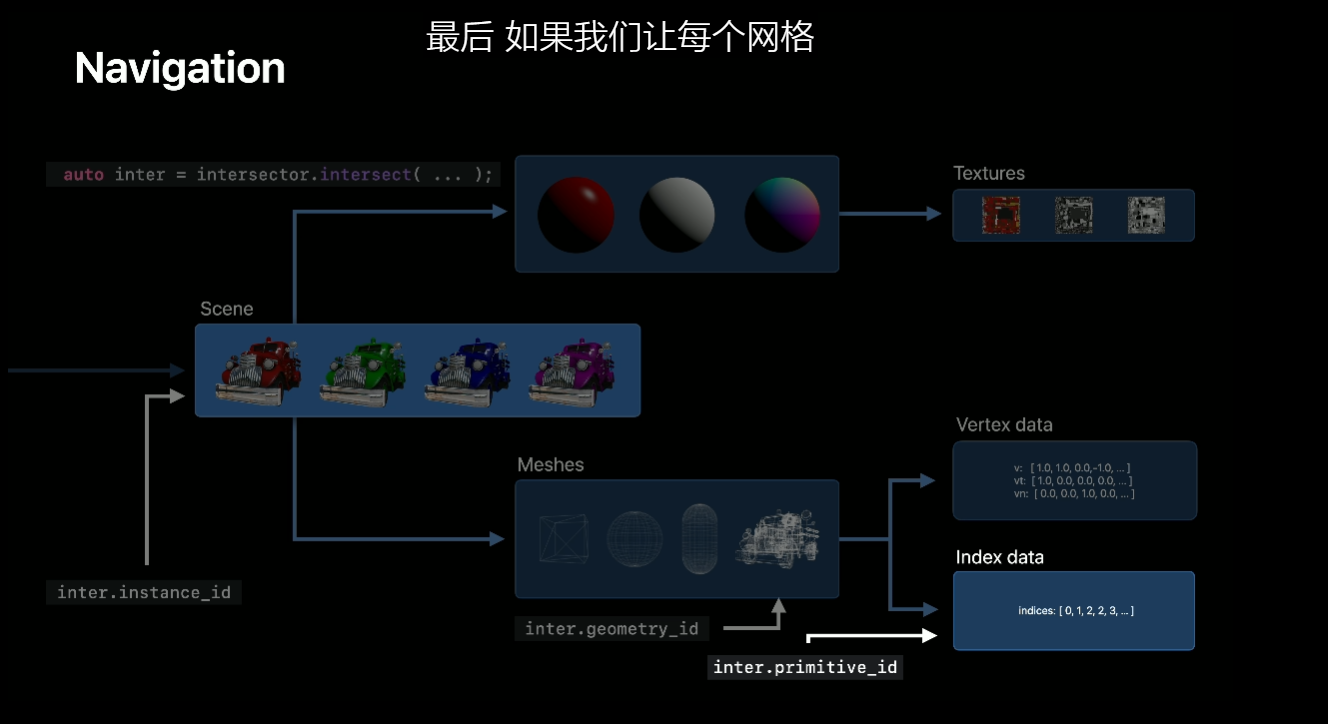
In the case of a triangle, for instance, we can pull the three indices from this array and use them to retrieve its vertex data.
Here's what this navigation looks like in Metal Shading Language.
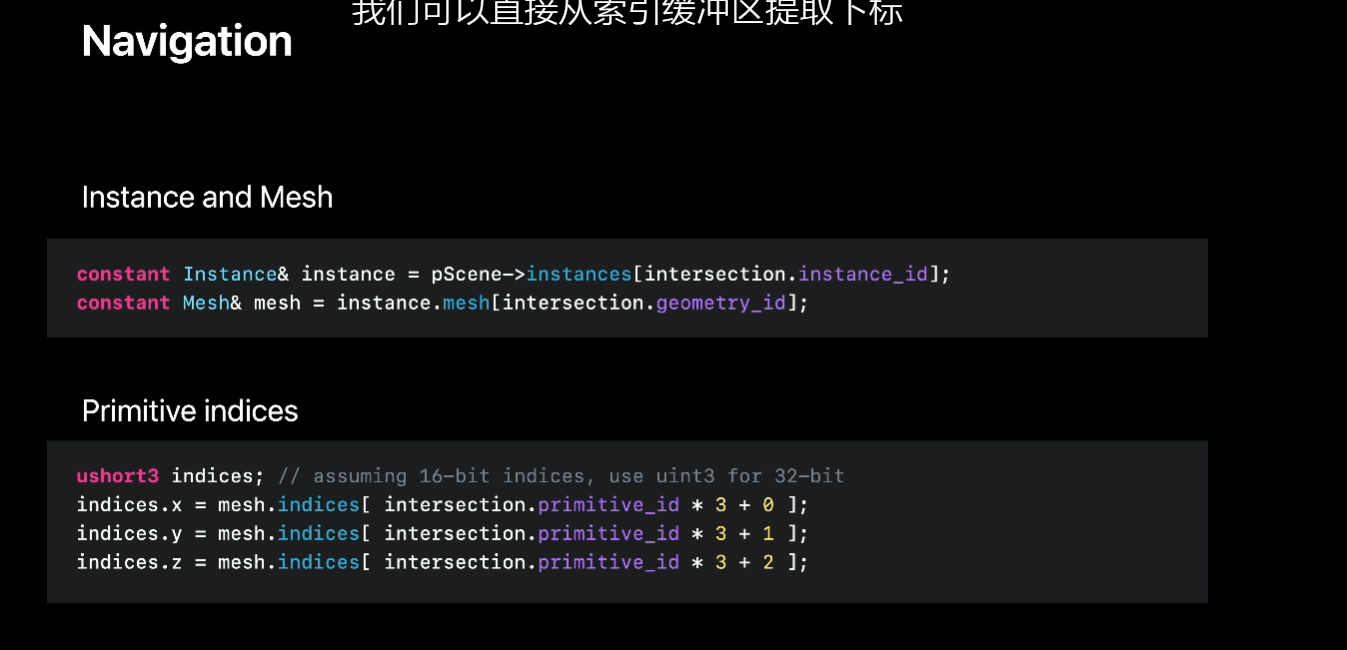
From the intersection object, we retrieve the instance_id and use it to dynamically index into our instances array and retrieve the instance we hit.
Next, having the instance, we use the geometry_id to determine which geometry or submesh was hit.
Once we've determined the geometry, we can directly pull the indices from the index buffer.
In the case of a triangle, we pull three indices, one after the other.
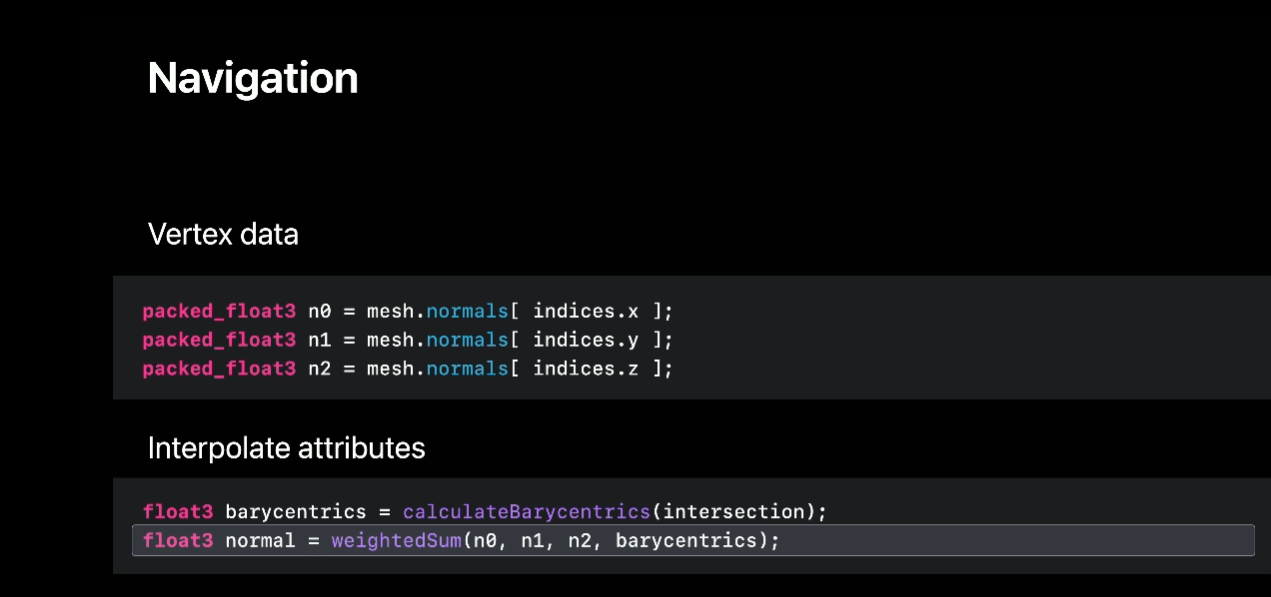
We use these indices to access into the vertex data array and retrieve any attribute we need for our technique.
For example, we can retrieve the normals corresponding to each vertex.
And finally, using the point's barycentric coordinates, we manually interpolate vertex normals to arrive at the correct normal at the intersection point.
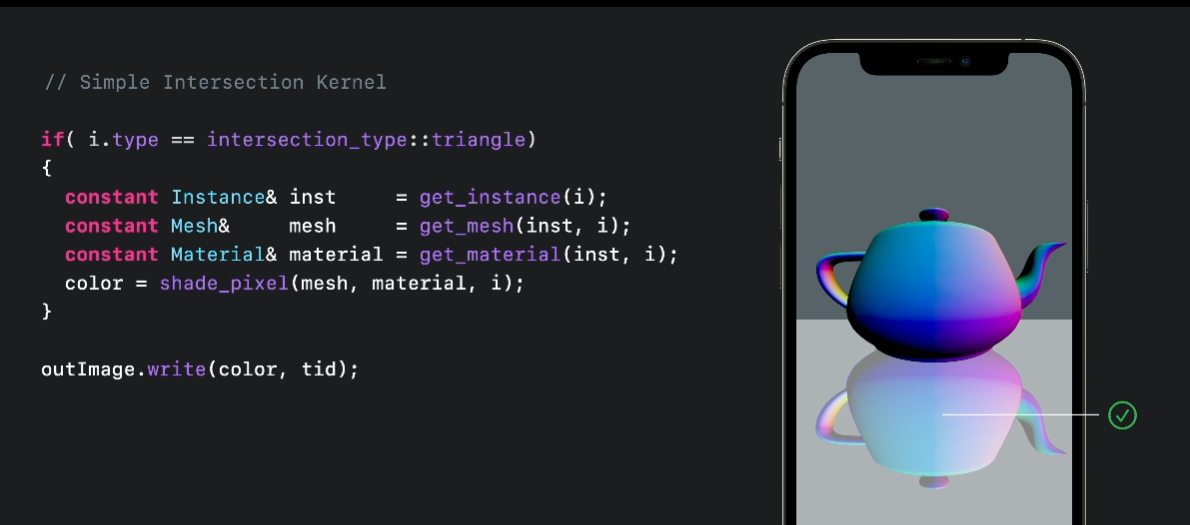
With these changes in place, taking it back to our teapot example, now that we have a way to calculate the normal at the intersection point, we can correctly shade our reflection.
We've updated the code to find the correct attributes at the intersection point, and now the results are visually correct.
We can now continue building on this framework to calculate any other attribute we want, such as texture coordinates to apply a texture or tangent vectors to implement normal mapping.
So here we saw how to navigate our bindless scene to retrieve vertex data, manually interpolate it, and finally, apply it to correctly shade all the intersection points discovered.
To help you bring these concepts into your own engine, we're going to be releasing a companion code sample that shows a concrete implementation of all of this.
This is a hybrid rendering sample that calculates ray-traced reflections for a scene loaded using the Model I/O framework.
The sample shows how you can encode a bindless scene that matches the ray tracing acceleration structures, and it also shows how to find intersections and correctly shade their associated pixels directly from your ray tracing shaders.
As we can see here, the sample also allows directly visualizing the output of the reflection ray tracing shader just at the points where the rays intersect the trucks.
This is great for iteratively experimenting with the reflection algorithm.
Now, we've covered a lot of ground here, and so far we've been centering most of our discussion in the context of ray tracing.
But as I mentioned earlier, we can apply the same principles to properly shade our pixels in the context of rasterization.
Physically based rendering is a great candidate for this.
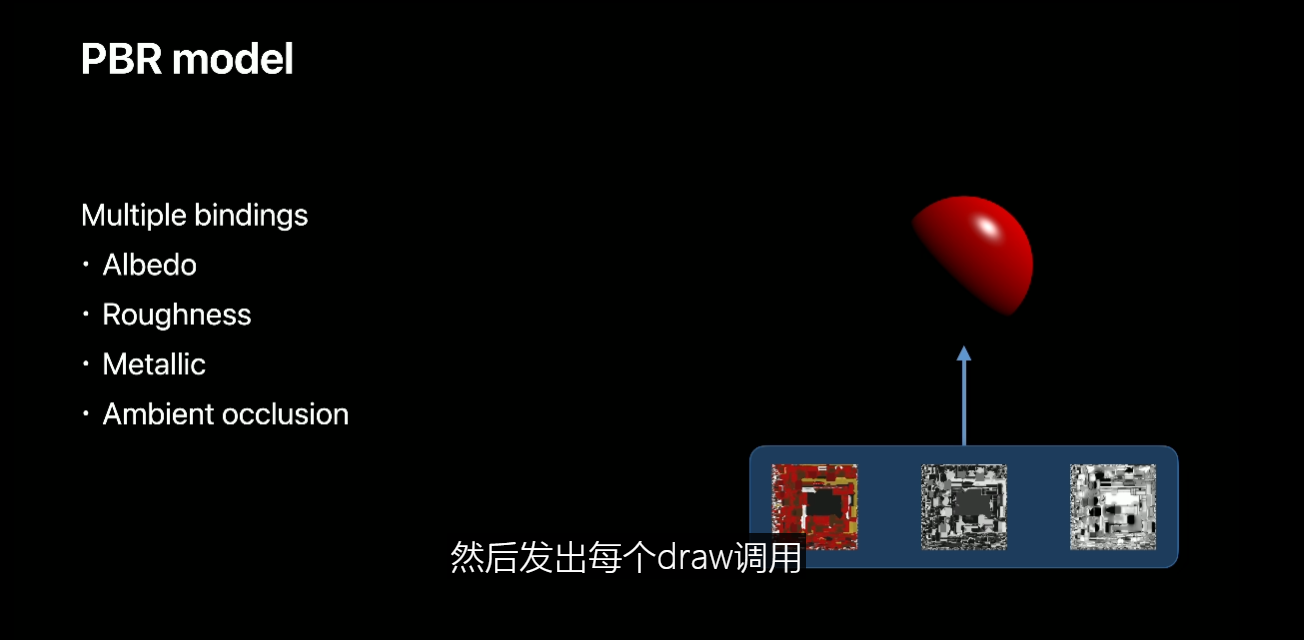
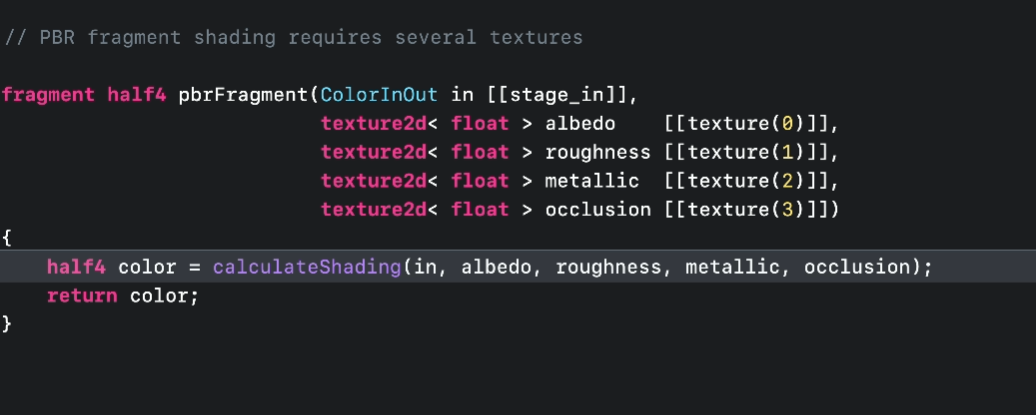
In PBR, our fragment shader needs information coming from several textures; for example, albedo, roughness, metallic, and ambient occlusion.
In the direct binding model, we need to bind each slot individually before issuing each one of our draw calls.
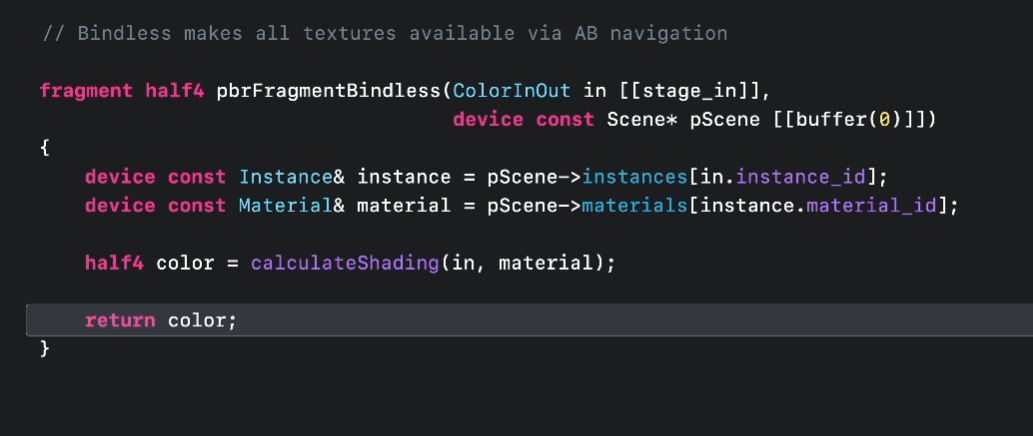
The bindless model vastly simplifies this.
Once we have encoded our argument buffers, we can directly bind the scene, navigate to the material corresponding to our draw call, and access all textures indirectly.
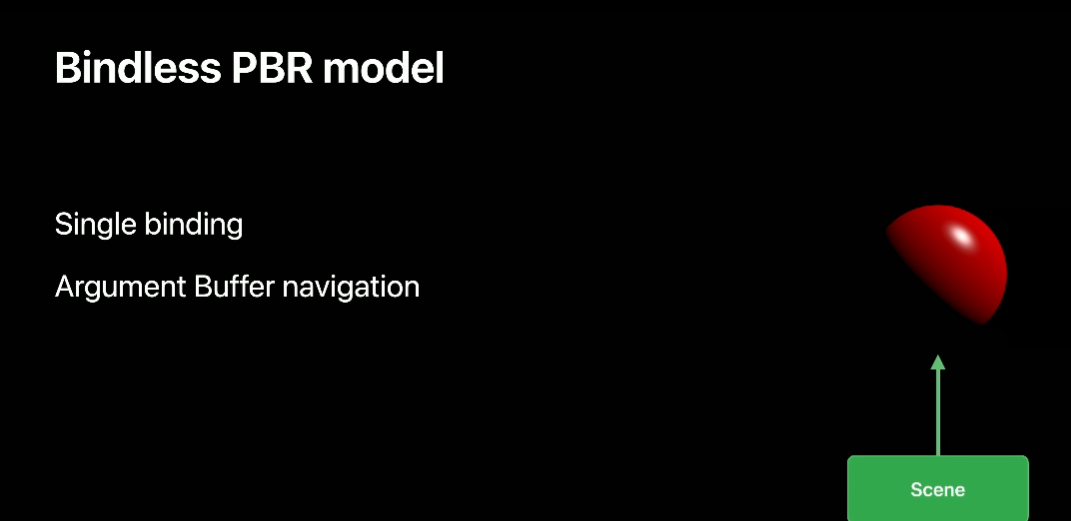
In fact, since we now just need to bind a single buffer once, this architecture provides an excellent opportunity to optimize our engines further by reducing the number of draw calls and use instanced rendering instead.
Just remember to make resident all textures we plan to access.
Here's an example of a typical PBR shader.
In the traditional model, each referenced texture needs to be individually bound before this draw call.
If the following draw call requires a different set of textures, all these resources need to be bound one by one as well.
When using a bindless model, we can now just pass our root argument buffer and retrieve our material directly from its referenced structures, just like before.
First we retrieve the instance -- this may be determined in the vertex shading stage -- then retrieve its material, and use its referenced textures and constant data to calculate the appropriate shading.
Finally, we just return the color.
All right! And that was a tour on how to effectively implement bindless rendering in Metal! To recap, we explored the Metal bindless model and saw how extremely flexible it is, allowing you to represent your scene any way you desire.
My recommendation is to design and build structures that ease the navigation for your given renderer.
This way, navigation becomes very natural, and you can even use the same buffers for both ray tracing and rasterization.
Bindless completely changes the game, giving your GPU all the data you need to implement modern rendering techniques.
You can even take it further and use this architecture to put the GPU in the driver seat and adopt indirect pipelines through indirect command buffers and GPU culling.

We can't wait to see how you put this in practice to deliver the next generation of graphical applications and games.
Thank you and enjoy the rest of WWDC 2021!
虽然并非全部原创,但还是希望转载请注明出处:电子设备中的画家|王烁 于 2023 年 11 月 8 日发表,原文链接(http://geekfaner.com/shineengine/WWDC2021_ExplorebindlessrenderinginMetal.html)